viernes, 30 de diciembre de 2016

Password File

What is?

The Oracle Password File assists the DBA with granting SYSDBA and SYSOPER privileges to other users. Creating a password file enables remote users to connect with administrative privileges through SQL*Net.

Create a password file

You can create a password file using the password file creation utility, ORAPWD. For some operating systems, you can create this file as part of your standard installation.

The syntax of the ORAPWD command is as follows:

ORAPWD FILE=filename [ENTRIES=numusers]
   [FORCE={Y|N}] [IGNORECASE={Y|N}] [NOSYSDBA={Y|N}]

Command arguments are summarized in the following table.
  • FILE
    • Name to assign to the password file. See your operating system documentation for name requirements. You must supply a complete path. If you supply only a file name, the file is written to the current directory.
  • ENTRIES (Optional)
    • Maximum number of entries (user accounts) to permit in the file.
  • FORCE (Optional)
    • If y, permits overwriting an existing password file.
  • IGNORECASE (Optional)
    • If y, passwords are treated as case-insensitive.
  • NOSYSDBA (Optional)
    • For Data Vault installations. See the Data Vault installation guide for your platform for more information.

There are no spaces permitted around the equal-to (=) character.

The command prompts for the SYS password and stores the password in the created password file.

Example

  • The following command creates a password file named orapworcl that allows up to 30 privileged users with different passwords.
    • orapwd FILE=orapworcl ENTRIES=30
  • Add a user to Password File.
    • Use the GRANT statement to grant the SYSDBA or SYSOPER system privilege to a user.
      • GRANT SYSDBA TO oe;
  • Confirm that the user is listed in the password file.
    • SQL> select * from v$pwfile_users;

remote_login_passwordfile

This parameter must be set to either SHARED or EXCLUSIVE. When set to SHARED, the password file can be used by multiple databases, yet only the SYS user is recognized.  When set to EXCLUSIVE, the file can be used by only one database, yet multiple users can exist in the file. 
Go to this post to get more details regarding remote_login_passwordfile.

Resultado de imagen para REMOTE_LOGIN_ PASSWORDFILE

miércoles, 28 de diciembre de 2016

REMOTE_LOGIN_ PASSWORDFILE

Setting REMOTE_LOGIN_ PASSWORDFILE

In addition to creating the password file, you must also set the initialization parameter REMOTE_LOGIN_PASSWORDFILE to the appropriate value. The values recognized are:


  • NONE
    • Setting this parameter to NONE causes Oracle Database to behave as if the password file does not exist. That is, no privileged connections are allowed over nonsecure connections.
  • EXCLUSIVE
    • (The default) An EXCLUSIVE password file can be used with only one instance of one database. 
    • Only an EXCLUSIVE file can be modified. Using an EXCLUSIVE password file enables you to add, modify, and delete users. 
    • It also enables you to change the SYS password with the ALTER USER command.
  • SHARED
    • A SHARED password file can be used by multiple databases running on the same server, or multiple instances of an Oracle Real Application Clusters (RAC) database. 
    • A SHARED password file cannot be modified. This means that you cannot add users to a SHARED password file. 
    • Any attempt to do so or to change the password of SYS or other users with the SYSDBA or SYSOPER privileges generates an error. 
    • All users needing SYSDBA or SYSOPER system privileges must be added to the password file when REMOTE_LOGIN_PASSWORDFILE is set to EXCLUSIVE. 
    • After all users are added, you can change REMOTE_LOGIN_PASSWORDFILE to SHARED, and then share the file.
    • This option is useful if you are administering multiple databases or a RAC database.


If REMOTE_LOGIN_PASSWORDFILE is set to EXCLUSIVE or SHARED and the password file is missing, this is equivalent to setting REMOTE_LOGIN_PASSWORDFILE to NONE.

Resultado de imagen para REMOTE_LOGIN_ PASSWORDFILE

lunes, 26 de diciembre de 2016

Consistent Whole Database Backup Recovery

NOARCHIVELOG Database Recovery 


If a media failure damages datafiles in a NOARCHIVELOG database, then the only option for recovery is usually to restore a consistent whole database backup.


What is a whole database backup


Take a whole database backup of all files that constitute a database after the database is shut down to system-wide use in normal priority. A whole database backup taken while the database is open, after an instance crash or shutdown abort is inconsistent. In such cases, the backup is not a consistent whole database backup because the files are inconsistent with respect to a current point-in-time.

Whole database backups do not require the database to be operated in a specific archiving mode. A whole database backup can be taken if a database is operating in either ARCHIVELOG or NOARCHIVELOG mode. If the database is in NOARCHIVELOG mode, then the backup must be consistent (meaning the database is shut down cleanly before the backup).


To restore the most recent whole database backup to the default location:


  1. If the database is open, then shut down the database.
    • SHUTDOWN IMMEDIATE
  2. If possible, correct the media problem so that the backup database files can be restored to their original locations.
    • Restore the most recent whole database backup with operating system commands. 
    • Restore all of the datafiles and control files of the whole database backup, not just the damaged files. 
    • The following example restores a whole database backup to its default location:
      • % cp /backup/*.dbf $ORACLE_HOME/oradata/trgt/ 
  3. Because online redo logs are not backed up, you cannot restore them with the datafiles and control files. In order to allow the database to reset the online redo logs, you must first mimic incomplete recovery:
    • RECOVER DATABASE UNTIL CANCEL;
  4. Open the database in RESETLOGS mode:
    • ALTER DATABASE OPEN RESETLOGS;

Imagen relacionada

domingo, 25 de diciembre de 2016

SPFILE


What SPFILE is?


  • Binary file
    • The term "binary file" is often used as a term meaning "non-text file".
  • Initialization parameter file
    • A server parameter file can be thought of as a repository for initialization parameters that is maintained on the machine running the Oracle Database server. It is, by design, a server-side initialization parameter file. 
  • Initialization parameters are persistent
    • Initialization parameters stored in a server parameter file are persistent, in that any changes made to the parameters while an instance is running can persist across instance shutdown and startup. 
  • ALTER SYSTEM statements
    • This arrangement eliminates the need to manually update initialization parameters to make persistent any changes effected by ALTER SYSTEM statements. It also provides a basis for self-tuning by the Oracle Database server.
  • CREATE SPFILE statement
    • A server parameter file is initially built from a text initialization parameter file using the CREATE SPFILE statement. (It can also be created directly by the Database Configuration Assistant). The server parameter file is a binary file that cannot be edited using a text editor.
  • PFILE
    • SPFILE is a binary file that contains the same information as the old PFILE.
Resultado de imagen para oracle spfile

viernes, 23 de diciembre de 2016

Oracle Data Pump

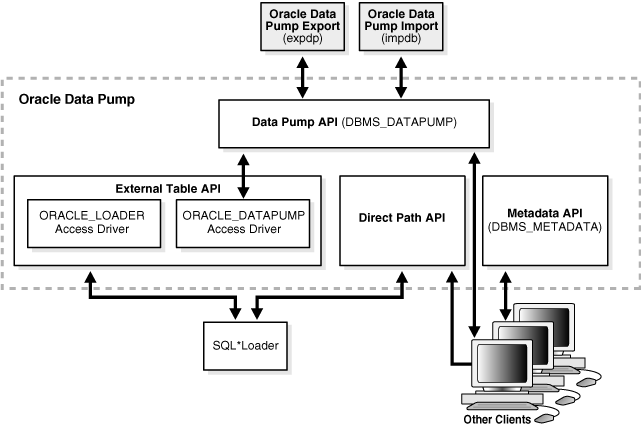
Oracle Data Pump is made up of three distinct parts:

  • The command-line clients, expdp and impdp
  • The DBMS_DATAPUMP PL/SQL package (also known as the Data Pump API)
  • The DBMS_METADATA PL/SQL package (also known as the Metadata API)

The Data Pump clients, EXPDP and IMPDP, invoke the Data Pump Export utility and Data Pump Import utility, respectively.

The expdp and impdp clients use the procedures provided in the DBMS_DATAPUMP PL/SQL package to execute export and import commands, using the parameters entered at the command line. These parameters enable the exporting and importing of data and metadata for a complete database or for subsets of a database.

When metadata is moved, Data Pump uses functionality provided by the DBMS_METADATA PL/SQL package. The DBMS_METADATA package provides a centralized facility for the extraction, manipulation, and re-creation of dictionary metadata.

The DBMS_DATAPUMP and DBMS_METADATA PL/SQL packages can be used independently of the Data Pump clients.

The users that perform the operations of (EXPDP and IMPDP) just need the following privileges:

  • CREATE OR REPLACE DIRECTORY test_dir AS '/u01/app/oracle/oradata/';
  • GRANT READ, WRITE ON DIRECTORY test_dir TO scott;
  • GRANT EXP_FULL_DATABASE TO SCOTT
  • GRANT IMP_FULL_DATABASE TO SCOTT
  • OPTION E (INCORRECT)
The EXPDP and IMPDP clients use the procedures provided in the DBMS_DATAPUMP PL/SQL package to execute export and import commands.

Table Exports/Imports

The TABLES parameter is used to specify the tables that are to be exported. The following is an example of the table export and import syntax.
  • expdp scott/tiger@db10g tables=EMP,DEPT directory=TEST_DIR dumpfile=EMP_DEPT.dmp logfile=expdpEMP_DEPT.log
  • impdp scott/tiger@db10g tables=EMP,DEPT directory=TEST_DIR dumpfile=EMP_DEPT.dmp logfile=impdpEMP_DEPT.log
The TABLE_EXISTS_ACTION=APPEND parameter allows data to be imported into existing tables.

Schema Exports/Imports

The OWNER parameter of exp has been replaced by the SCHEMAS parameter which is used to specify the schemas to be exported. The following is an example of the schema export and import syntax.
  • expdp scott/tiger@db10g schemas=SCOTT directory=TEST_DIR dumpfile=SCOTT.dmp logfile=expdpSCOTT.log
  • impdp scott/tiger@db10g schemas=SCOTT directory=TEST_DIR dumpfile=SCOTT.dmp logfile=impdpSCOTT.log

Database Exports/Imports

The FULL parameter indicates that a complete database export is required. The following is an example of the full database export and import syntax.
  • expdp system/password@db10g full=Y directory=TEST_DIR dumpfile=DB10G.dmp logfile=expdpDB10G.log
  • impdp system/password@db10g full=Y directory=TEST_DIR dumpfile=DB10G.dmp logfile=impdpDB10G.log
Resultado de imagen para Oracle Data Pump

miércoles, 21 de diciembre de 2016

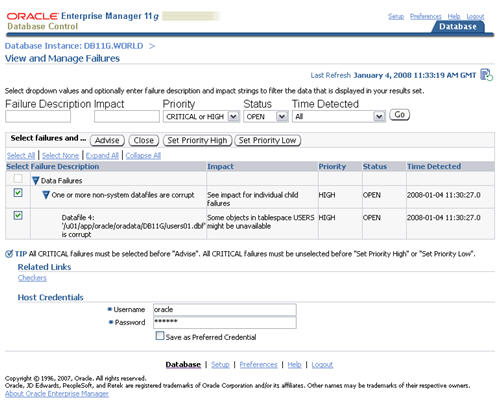
RMAN Data Recovery Advisor (DRA)

Purpose of Data Recovery Advisor

Automatically diagnoses data failures, determines and presents appropriate repair options, and executes repairs at the user's request. 

In this context, a data failure is a corruption or loss of persistent data on disk. By providing a centralized tool for automated data repair, Data Recovery Advisor improves the manageability and reliability of an Oracle database and thus helps reduce the MTTR.

Data Recovery Advisor provides the following advantages over traditional repair techniques:

  • Data Recovery Advisor can potentially detect, analyze, and repair data failures before a database process discovers the corruption and signals an error. Early warnings help limit damage caused by corruption.
  • Manually assessing symptoms of data failures and correlating them into a problem statement can be complex, error-prone, and time-consuming. Data Recovery Advisor automatically diagnoses failures, assesses their impact, and reports these findings to the user.
  • Execution of a data repair can be complex and error-prone. If you choose an automated repair option, then Data Recovery Advisor executes the repair and verifies its success.


In the RMAN command-line interface, the Data Recovery Advisor commands are LIST FAILURE, ADVISE FAILURE, REPAIR FAILURE, and CHANGE FAILURE:


  • The LIST FAILURE command displays any failures with a status OPEN and a priority of CRITICAL or HIGH in order of importance. If no such failures exist it will list LOW priority failures.
    • LIST FAILURE;
  • The ADVISE FAILURE command, as the name implies, provides repair advice for failures listed by the LIST FAILURE command, as well as closing all open failures that are already repaired.
    • ADVISE FAILURE;
  • The REPAIR FAILURE command applies the repair scripts produced by the ADVISE FAILURE command. Using the PREVIEW option lists the contents of the repair script without applying it.
    • REPAIR FAILURE PREVIEW;
    • By default, the REPAIR FAILURE command prompts the user to confirm the repair, but this can be prevented using the NOPROMPT keyword.
      • REPAIR FAILURE NOPROMPT;
  • The CHANGE FAILURE command allows you to change the priority of a failure or close an open failure. You may wish to change the priority of a failure if it does not represent a problem to you. For example, a failure associated with a tablespace you know longer use may be listed as a high priority, when in fact it has no effect on the normal running of your system.
    • RMAN> CHANGE FAILURE 202 PRIORITY LOW;

Resultado de imagen para RMAN Data Recovery Advisor (DRA)

lunes, 19 de diciembre de 2016

SET_TABLE_PREFS Procedure

Starting in 11g, there are three new arguments to the SET_TABLE_PREFS procedure, designed to allow the DBA more control over the freshness of their statistics:

  • STALE_PERCENT - overrides the one-size-fits-all value of 10%.
  • INCREMENTAL - Incremental statistics gathering for partition.
  • PUBLISH - Allows the DBA to test new statistics before publishing them to the data dictionary.

This is an important 11g new feature because the DBA can now control the quality of optimizer statistics at the table level, thereby improving the behavior of the SQL optimizer to always choose the "best" execution plan for any query.

DBMS_STATS.SET_TABLE_PREFS

Oracle also has a feature ("PUBLISH, false") feature in DBMS_STATS.SET TABLE_PREFS that allows you to collect CBO statistics and use them for testing without "publishing" them into the production environment.

For example:

You can change the PUBLISH setting for the customers table in the SH schema, execute the statement:

EXEC DBMS_STATS.SET_TABLE_PREFS('SH', 'CUSTOMERS', 'PUBLISH', 'FALSE');

When Oracle automatically enables statistics collection, the default "staleness" threshold of 10% can now be changed with the DBMS_STATS.SET_TABLE_PREFS procedure:

EXEC DBMS_STATS.SET_TABLE_PREFS('HR', EMPS', 'STALE_PERCENT', '15%')

You can also expand upon this functionality at greater levels of breadth using these news procedures:

  • DBMS_STATS.SET_SCHEMA_PREFS - This is like RUNNINGSET_TABLE_PREFS, but for all objects in the schema
  • DBMS_STATS.SET_DATABASE_PREFS - This runs the SET_TABLE_PREFS for all of the schemas in the current database.
  • DBMS_STATS.SET_GLOBAL_PREFS - This runs SET_TABLE_PREFS for all databases in the environment.

Resultado de imagen para oracle SET_TABLE_PREFS

domingo, 18 de diciembre de 2016

Definer's Rights & Invoker's Right


Managing Security

You can control access to privileges that are necessary to run user-created procedures by using definer's rights, which execute with the privileges of the owner, or with invoker's rights, which execute with the privileges of the user running the procedure.

  • In a definer's rights procedure, the procedure executes with the privileges of the owner. The privileges are bound to the schema in which they were created.
 Description of Figure 5-3 follows
  • An invoker's rights procedure executes with the privileges of the current user, that is, the user who invokes the procedure.
Description of Figure 5-2 follows

For example:
Suppose user bixby creates a procedure that is designed to modify table cust_records and then he grants the EXECUTE privilege on this procedure to user rlayton. If bixby had created the procedure with definer's rights, then the procedure would look for table cust_records in bixby's schema. Had the procedure been created with invoker's rights, then when rlayton runs it, the procedure would look for table cust_records in rlayton's schema.

By default, all procedures are considered definer's rights. You can designate a procedure to be an invoker's rights procedure by using the AUTHID CURRENT_USER clause when you create or modify it, or you can use the AUTHID DEFINER clause to make it a definer's rights procedure.

sábado, 17 de diciembre de 2016

Avoid Frequent Checkpoints

A frequent checkpoints degraded the perform of the database, but what can we do to solve it?

  • Check the size of the redo log file size and increase the size if it is small.
  • Set the FAST_START_MTTR_TARGET parameter as per the advice given by the MTTR Advisor.

Increase the size of the redo log:

The size of the redo log files can influence performance, because the behavior of the database writer and archiver processes depend on the redo log sizes.

Generally, larger redo log files provide better performance, however it must balanced out with the expected recovery time. Undersized log files increase checkpoint activity and increase CPU usage.


MTTR Advisor:

SELECT * FROM V$MTTR_TARGET_ADVICE;

The Estimated MTTR Oracle metric is the current estimated mean time to recover (MTTR) in the number of seconds based on the number of dirty buffers and log blocks.

The MTTR was developed to measure the amount of downtime that will be incurred should there be a catastrophic failure of some component within the computer system. Of course, for continuously available systems the MTTR should be equal to zero.

Whenever you set fast_start_mttr_target to a nonzero value, and while MTTR advisory is ON, Oracle Corporation recommends that you disable (set to 0) the following parameters:

LOG_CHECKPOINT_TIMEOUT
LOG_CHECKPOINT_INTERVAL
FAST_START_IO_TARGET

Enabling MTTR Advisory 

Enabling MTTR Advisory involves setting two parameters:

alter system SET STATISTICS_LEVEL=TYPICAL SCOPE=BOTH;
alter system SET FAST_START_MTTR_TARGET > 0 SCOPE=BOTH;

Resultado de imagen para oracle checkpoints